Step 1: Do whatever editing you need to do to each frame (you can copy paste adjustment layers so they're consistent for each image). Then I recommend saving them with their frame number in the file name. It will do that annoying thing where it's sorted alphabetically so 1, 10, 11 rather than 1, 2, 3. If you have a lot of frames and it will be confusing then you should use three digits with leading zeros 001, 002, 003. I usually just use jpeg maximum quality (12?). Save and close.
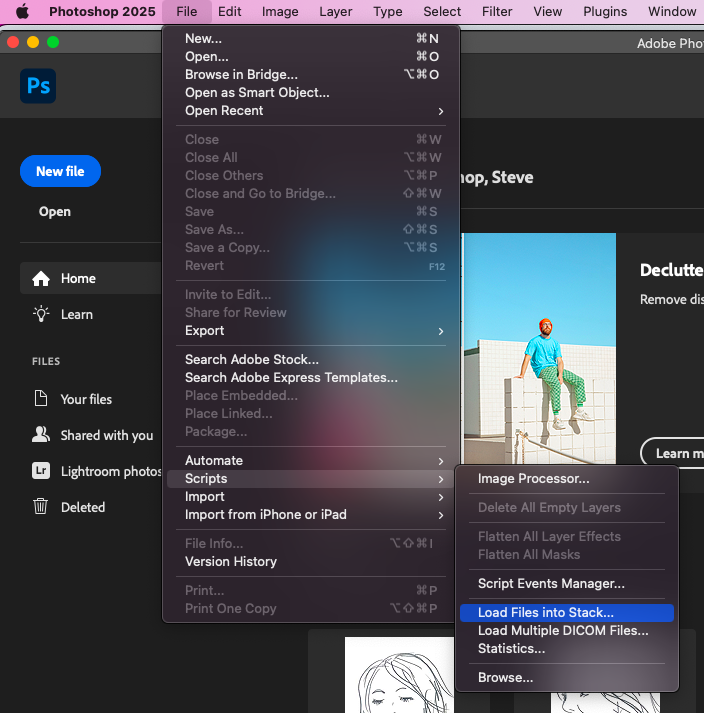
Step 2: From the Photoshop home page go to File -> Scripts -> Load Files into Stack...
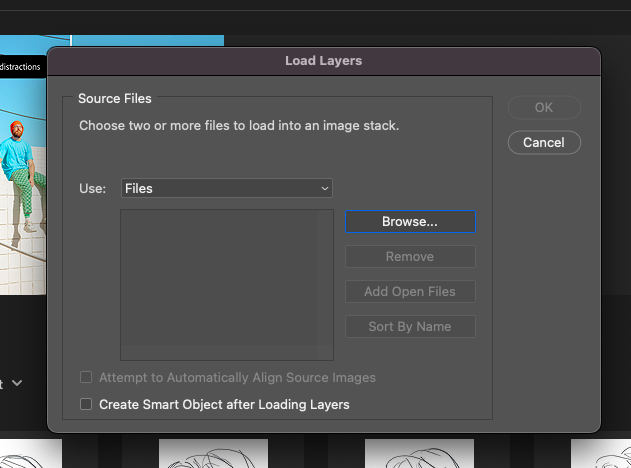
Step 3: Use the dialogue box to load your frames. You can load a whole folder if that's easier or just select multiple using Shift. It has an option to attempt to automatically align the frames, no idea if this works or what it does, but that might be helpful in some scenarios. Once you click OK it will load your frames into a single Photoshop file with each of the frames as a layer.
Step 4: Depending on how many frames and how big they are this might take a second. Once it has loaded you can change the order and because they are layers you can reduce the transparency/visibility to fix any alignment issues.

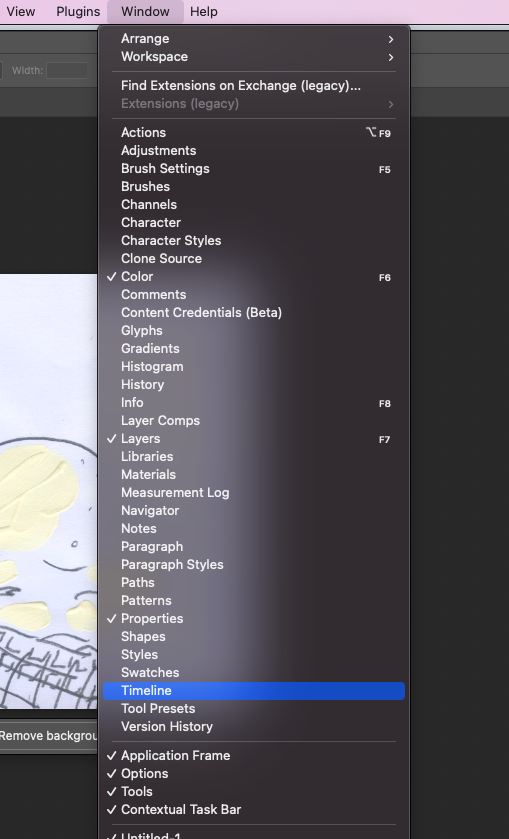
Step 5: Open the Timeline toolbar if you don't have it open already (this was called the Animation toolbar in older versions, I don't know if you're actually allowed to have older versions of Photoshop anymore).
Window ->Timeline
Step 6: Make sure the drop down thing is set to Create Frame Animation and then click on it (it will make your top layer frame 1).

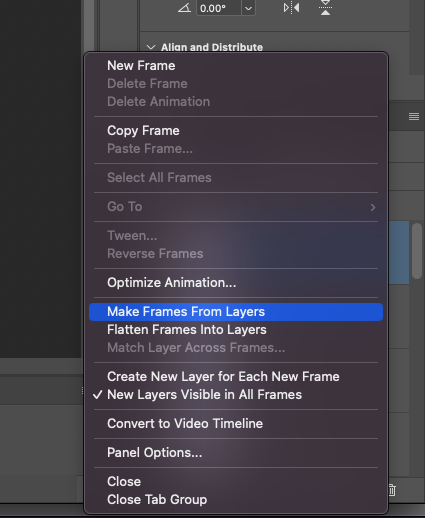
Step 7: Click the three lines menu on the top right of the timeline and choose Make Frames From Layers. There's other stuff in this menu you might find useful. Reverse frames will put them in reverse order.
Step 8: This is the part where you start playing with your animation. You use the controls to play, advance by one frame, go to start. It also has an auto tweening which I've never used and you can duplicate frames (which I use to make boomarang loops), or delete them.
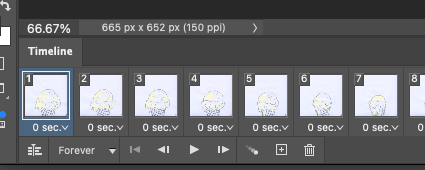
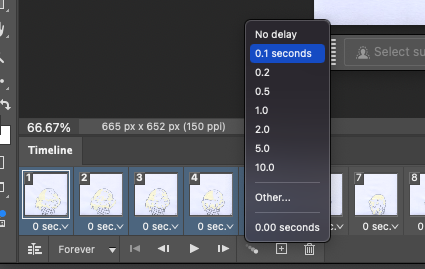
Step 9: Set your frame rate in fractions of a second using the little drop down below the frame that says 0 sec. by default. You can Shift select all the frames to change them all at once or just change one at a time.
Step 10: Saving There are a three main ways to get your animation off your computer.
Step 10.1 GIFs
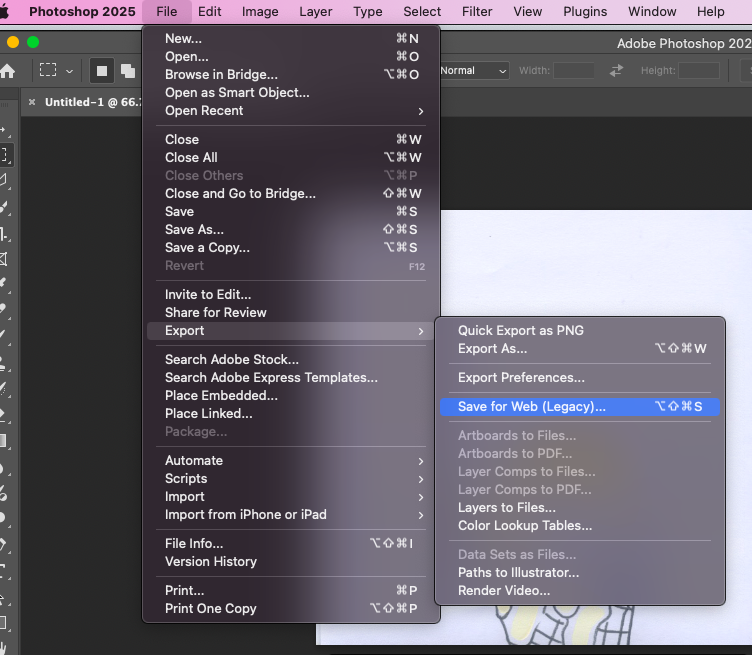
To make a GIF you go to File -> Export -> Save for Web (legacy).
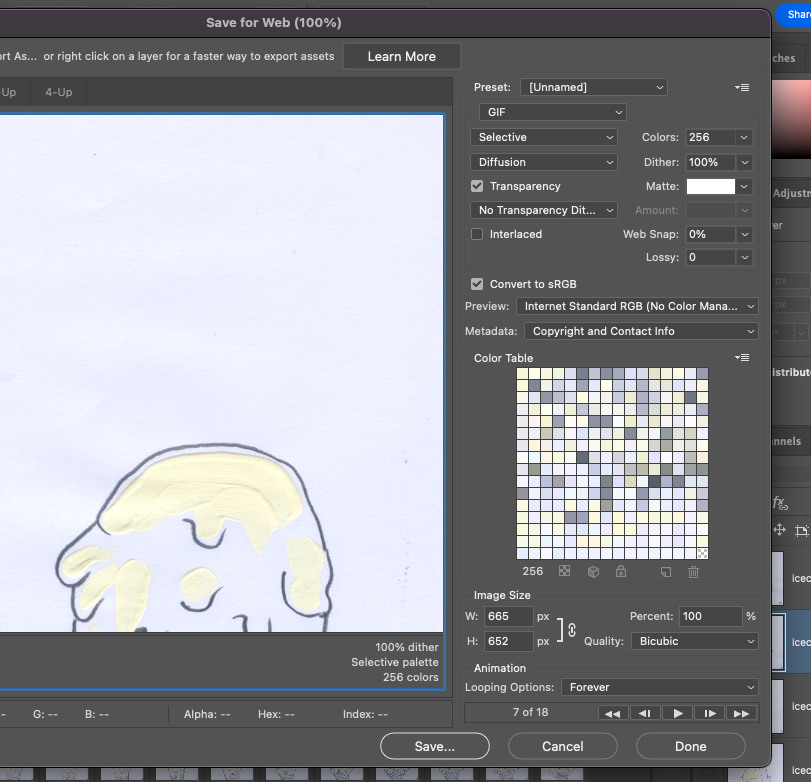
I don't really know what all the settings do and you lose a lot of quality if you're working with photos because GIFs only use 256 colours, but a lot of the time this doesn't matter or can be an interesting effect. The main thing to change here is the size.
Step 10.2 Video for Instagram
I admit this is a bit unhinged, but seems to be the least annoying way to get a video onto insta without the file being huge or too much loss of quality. I also use this for any other movies I make. First I will play the animation in photoshop, then use Cmd+Shift+5 to open the screen recording menu, then set the capture area to just the animation, then record it, and then airdrop that recording to my phone.
Step 10.3 Proper Video Export (mp4)
File -> Export ->Render Video...
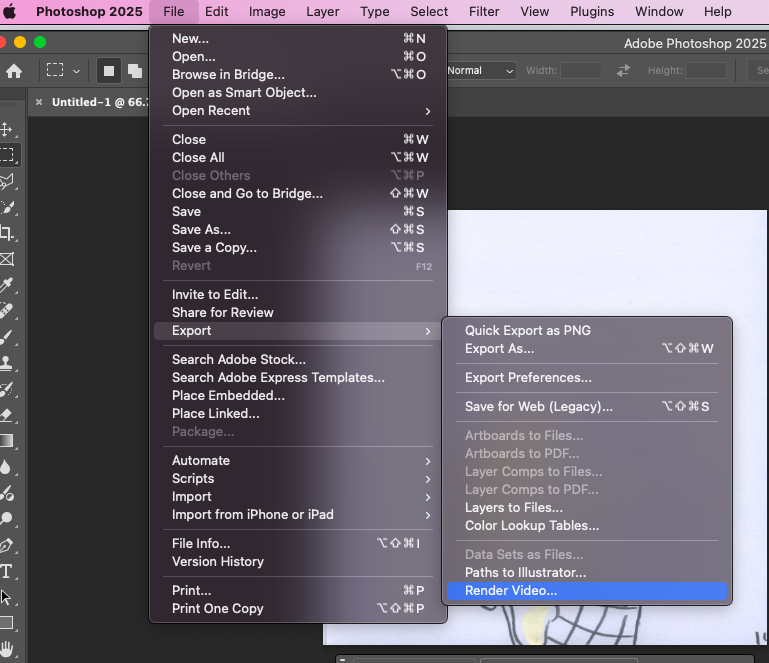
There are lots of possible settings, these ones seem to work well for me. You might find you need to change the frame rate and it won't preserve the loop so if you want a loop you'll need to copy and paste your frames a few times. Once it's in mp4 though you can have fun with Premiere and After Effects, or stick it in iMovie. My favourite phone video editor is called Splice. It is really excellent but it is not free.

Step 11: Publish your work!

•?((¯°·._.• •._.·°¯))؟•
Step 2: From the Photoshop home page go to File -> Scripts -> Load Files into Stack...

Step 3: Use the dialogue box to load your frames. You can load a whole folder if that's easier or just select multiple using Shift. It has an option to attempt to automatically align the frames, no idea if this works or what it does, but that might be helpful in some scenarios. Once you click OK it will load your frames into a single Photoshop file with each of the frames as a layer.

Step 4: Depending on how many frames and how big they are this might take a second. Once it has loaded you can change the order and because they are layers you can reduce the transparency/visibility to fix any alignment issues.

Step 5: Open the Timeline toolbar if you don't have it open already (this was called the Animation toolbar in older versions, I don't know if you're actually allowed to have older versions of Photoshop anymore).
Window ->Timeline

Step 6: Make sure the drop down thing is set to Create Frame Animation and then click on it (it will make your top layer frame 1).

Step 7: Click the three lines menu on the top right of the timeline and choose Make Frames From Layers. There's other stuff in this menu you might find useful. Reverse frames will put them in reverse order.

Step 8: This is the part where you start playing with your animation. You use the controls to play, advance by one frame, go to start. It also has an auto tweening which I've never used and you can duplicate frames (which I use to make boomarang loops), or delete them.

Step 9: Set your frame rate in fractions of a second using the little drop down below the frame that says 0 sec. by default. You can Shift select all the frames to change them all at once or just change one at a time.

Step 10: Saving There are a three main ways to get your animation off your computer.
Step 10.1 GIFs
To make a GIF you go to File -> Export -> Save for Web (legacy).

I don't really know what all the settings do and you lose a lot of quality if you're working with photos because GIFs only use 256 colours, but a lot of the time this doesn't matter or can be an interesting effect. The main thing to change here is the size.

Step 10.2 Video for Instagram
I admit this is a bit unhinged, but seems to be the least annoying way to get a video onto insta without the file being huge or too much loss of quality. I also use this for any other movies I make. First I will play the animation in photoshop, then use Cmd+Shift+5 to open the screen recording menu, then set the capture area to just the animation, then record it, and then airdrop that recording to my phone.
Step 10.3 Proper Video Export (mp4)
File -> Export ->Render Video...

There are lots of possible settings, these ones seem to work well for me. You might find you need to change the frame rate and it won't preserve the loop so if you want a loop you'll need to copy and paste your frames a few times. Once it's in mp4 though you can have fun with Premiere and After Effects, or stick it in iMovie. My favourite phone video editor is called Splice. It is really excellent but it is not free.

Step 11: Publish your work!

•?((¯°·._.• •._.·°¯))؟•